A while back I read an interesting article that placed hobbyists making things (Level 1 – 1-100 units) on the same axis as big manufactures (Level 3 – 5000+ units) [as an aside, the writer now has a robust 7+ person company making tools for Level 2 manufacturing].
I’m definitely in the Level 1 side of things. I often make just one of something.
But in the world of electronics, often you end up with multiple boards for really cheap or you want to make a few dozen of one board for your own use. Assembling things and soldering components is a pain at that scale, especially if you want to use the more compact surface mounted components, and especially if those surface mount components are really teeny.
Easy Bake
I find being able to use free tools to design a circuit board, easily print the boards, and then use cheap components to build your own circuitboard as a kind of superpower. The range of creations out there that anyone can design and build is wonderful. (can I interest you in #badgelife?)
What a lot of folks do when they have a bunch of boards is either use a hot gun to solder a boardful of components, or do as the pros do: use an oven.
There are hacks and such of folks manually reflowing the solder, following a solder reflow profile of different temperatures. But the ease of tools-beget-tools means there are controllers one can use to automate the oven process.
Unexpected purchase
In the process of moving house, my mother had a toaster oven that no one needed, so I claimed it specifically to make a reflow oven. [
I then picked up a controller from a great guy, who, by the way, went thru the three layers of manufacturing in the past seven or so years – he’s now a Level 3. Indeed, the origin of his reflow oven controller was from his time as a Level 1, before he bought a proper oven as he stepped up to Level 2.
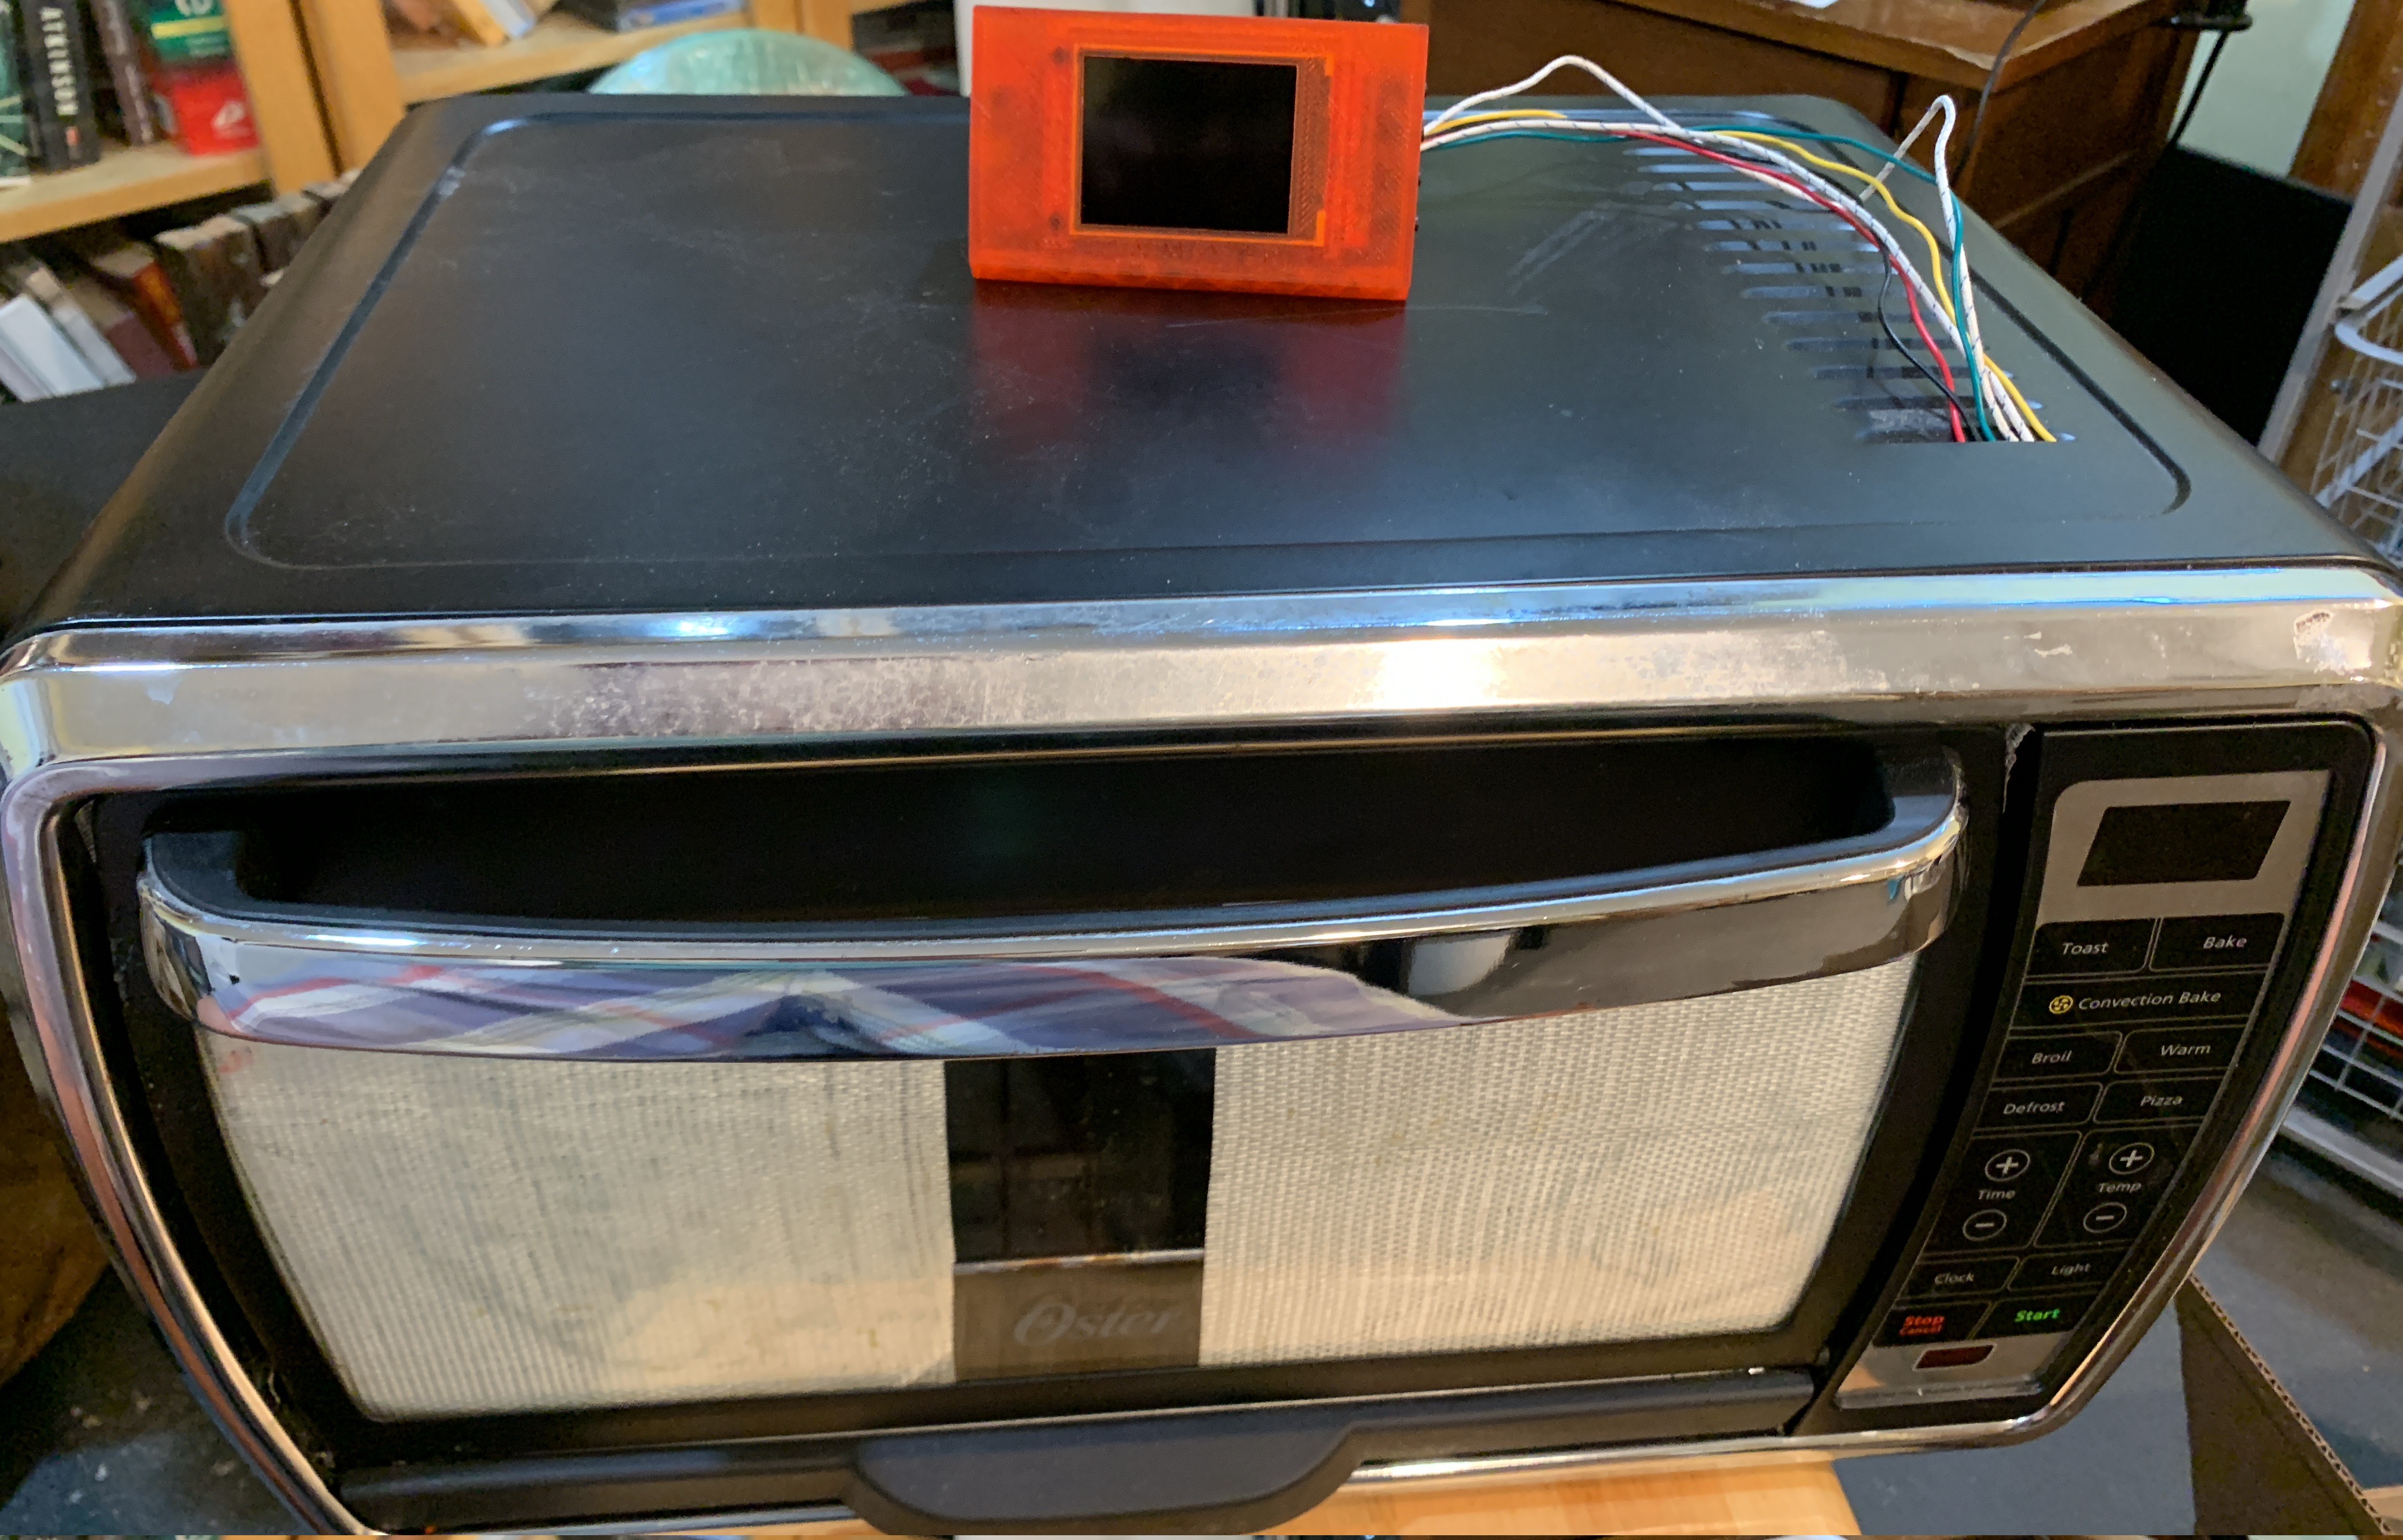
I ripped out the guts of the toaster, rewired it to be directed by the controller, and ran a test run.
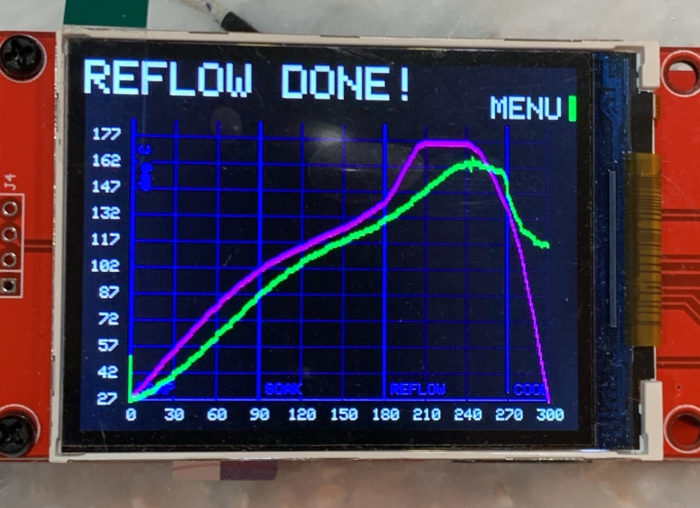
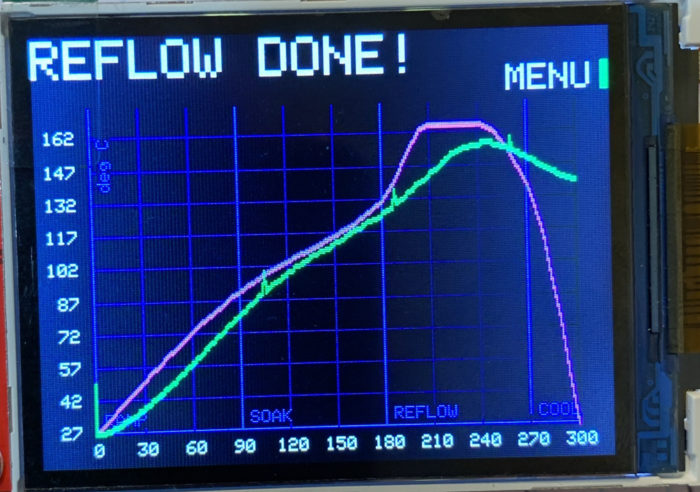
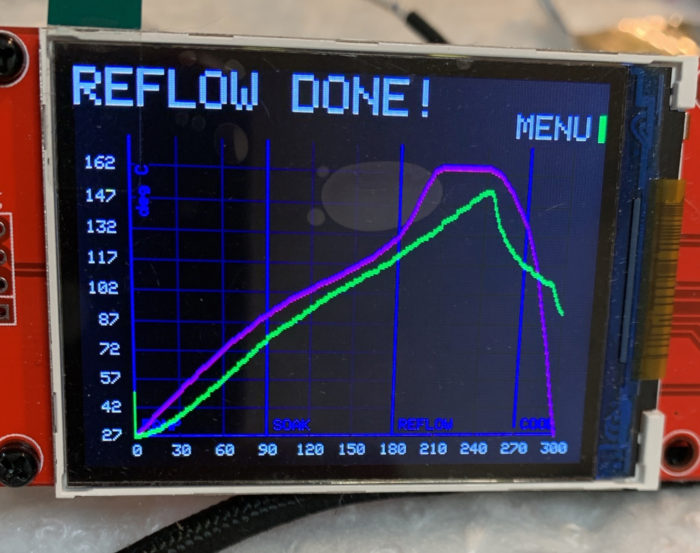
Alas, seemed like my oven (in green) couldn’t keep to the desired temp profile (in pink).
I did some reading. Saw a lot about oven volume and element strength, insulation.
So I figured I need to insulate the oven big time and get things in order.
Interesting but a non-experiment
I wrapped the insides in a insulating blanket, plugged up some holes, added some reflectors. And then, excited, ran the test run again.
WTF. No better than uninsulated. Then I see that the controller maker never insulated his oven. And thinking of it, the time frame is so short, probably doesn’t make a difference (which of course the data supports).
Then I wondered if my two elements just couldn’t hit the temps, even though they should.
A test run at really hight temps showed that the elements and oven are more than able to reach the temps in time, albeit, not matching the desired curve.
Then, in what are those, ‘fuck, why did it only occur to me now after all the work I put in?’ moments, I realized I could tweak the controller to hit the needed reflow temps by just raising the desired temps in the controller profile.
Worked. Now, even though (left below) the pink measured temp don’t match the green desired temps, I am hitting the right temps for my reflow.
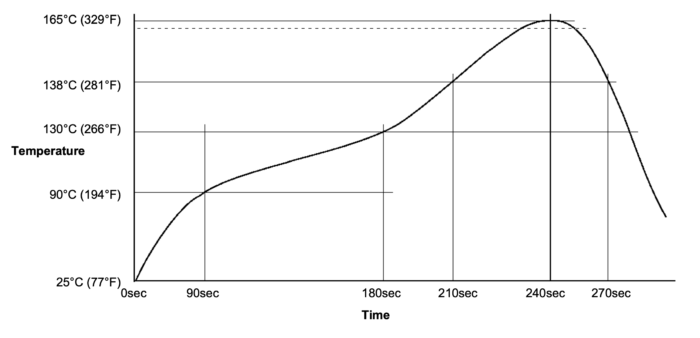
Indeed, I was able to match the required temp curve for my solder paste reflow profile (right below).
Keep calm and make something
Of course, all this was leading up to a board I wanted to make.
As this was the first board I made in a reflow oven, I learned a lot in the process: This was my first proper project to use solder paste, meaning getting a stencil and making a jig to hold things. The components were the smallest I’ve ever used. The board was double-sided, so needed a tricky two rounds of reflow. The chips had closely spaced pins, so needed to clean that up – rework. And I had some thru-hole parts that had to be added, that were easy peasy.
And, yes, the product worked as designed. And that’s why I made it myself as there was no one selling something similar. Fortunately for me, someone had designed this one and graciously made the design available.
What’s next?
Funny thing is, when I bought the controller a while back, I had a lot of ideas on things I wanted to make. But now, my head is elsewhere and the oven has not been used since the run of a few copies of the board above.
Hm, could also be that the price of just having someone else assemble the boards is falling fast, and, well, after buying all the oven and components and boards and all, and putting in the time needed, this board might have been cheaper just having it assembled for me. This also means perhaps I now have a higher hurdle to make it worthwhile to use the oven.
Let’s see.
From China with Love
As with most purchases of boards and components from China, when you want only one, you end up getting more than 10 of everything (soo inexpensive!). Therefore, I still have a handful of extra unassembled boards. I might just complete all those and sell them (at cost, most likely, as they were not designed by me).
And for the boards I had in mind way back when, I think I will have to balance the cost of me assembling them verses someone else in China doing it.
Looking back and ahead
Two things are constant in the maker world.
One is, why buy it when you can make it for more?
Two is, often it’s the journey that counts, not the destination. In the process of doing, you learn, you share, you discover new things that open new doors.
I did spend a pretty penny on building that reflow oven and making one copy of that board. And who knows if I will ever make that money back in savings making my own boards, in these days of cheap assembly. Nonetheless, I do feel the whole journey was fascinating, granted me a whole level of abilities, and opened up a range of new things I can do.
Let’s see where that path of this journey takes me next.
I am going through this exact process now! I have built the controller into a nice box, modded the oven and now need to tweak some settings. It has not been cheap, but it has been fun!
Cool. Share a link to the final build photo when you’re done!